I have been obsessed with the clothing of the Tudor era ever since I was a young girl. In fact, at one point in time, I hand-sewed a self-drafted gown of blue velvet, at which time I was perhaps 12 or 13. (Yeah, I was very geeky.) And the very first costume I ever made with a pattern was this (laughably inaccurate) Purple Tudor Gown.
In those days, it was difficult to find reference books detailing the historical costume of the period, so I had to make do with guessing from portraits. Nowadays there is a significantly larger trove of details, in particular the excellent book "The Tudor Tailor" by Ninya Mikhaila and Jane Malcolm Davies. Getting this book as a Christmas gift from my parents was a long-awaited dream come true. Now all that remained was to complete a full-Tudor ensemble...
When creating a historical costume, one must build from the foundations up, to ensure the correct shape and sizing of each piece. I started my Tudor Ensemble with this White Shift. Next, I needed to construct a corset. This ended up being a much longer project than I intended. Between health and home responsibilities, it took me about 9 months from start to finish - closer to a year if you count writing this blog post!
(While the historical term is 'stays' I am so used to calling this a corset, that I hope stricter historians will forgive me for using that term in this piece).

Although I have done boned bodices before, this was my first piece that really worked as a proper corset. Although I largely followed the pattern in the Tudor Tailor for shaping and structure, I had to make some additional modifications to accommodate a significant curve ratio. Thus my corset is not nearly as flat as the fashionable style of the period.
I also chose to work entirely with materials I had on hand, which means that my choices were not always the most historically accurate. In the end, my goal was to make a pretty, functional garment that created the most period accurate silhouette that my figure was capable of comfortably achieving.

Because my proportions were so different than the 'average' figure for which the pattern in the book was intended, I didn't bother with scaling it up. Instead I followed the lines of the pattern in the book, but completed drafted my own pieces on my dress form.

As stated, due to budgetary constraints (and an overflowing fabric stash), I did not purchase a single new thing in creating this corset. This meant that I did not have coutil, the fabric favored for making corsets. I chose to use denim as a sometimes suggested substitute, with light interfacing, for the interior of the bodice.

Brocade outside, denim/interfacing interior, another layer of stiff blue fabric for further stiffness and a fake poly silk lining. So. Many. Pieces.

Here you can see all of the pieces lined up!

I wanted to add a further special detail to the corset, so I chose to embroider a complimentary flower on the back of the brocade. It makes for a sweet little unique detail.

One measure I took to cut down on time was to stitch each inner layer in with an outer layer. This cut the time sewing seams together by 50%, and made no significant difference to the final fit of the garment.

Because I had four layers of fabric on each seam, I decided to topstitch down each side, to help it lay flat and provide further strengthening. This was not a historical detail, just a functional decision I made.

Then it was time to bone. Thankfully, I had a lot of boning on hand. Not so thankfully it wasn't super stiff. The finished garment is pretty strong, but not quite as strong as it really ought to be. However, it works well enough for the purpose.

The proper way to stitch down channels is to draw them first. I did draw some of them, but, if I recall correctly, at some point I stopped drawing and just went by the seam allowances and it worked fine. Inserting the boning got very tedious after awhile, and at this point I put the project aside for several months.

Part of the reason for the long hiatus was my fibromyalgia. I get significant pain in my fingers and I was really dreading all of the handsewing that would be necessary to finish the binding for the corset. Thankfully, in the fall of 2016 I started a new chiropractic treatment that relieved my hand pain enough to allow for some hand stitching. By winter 2017, I was able to stitch the binding on the corset.

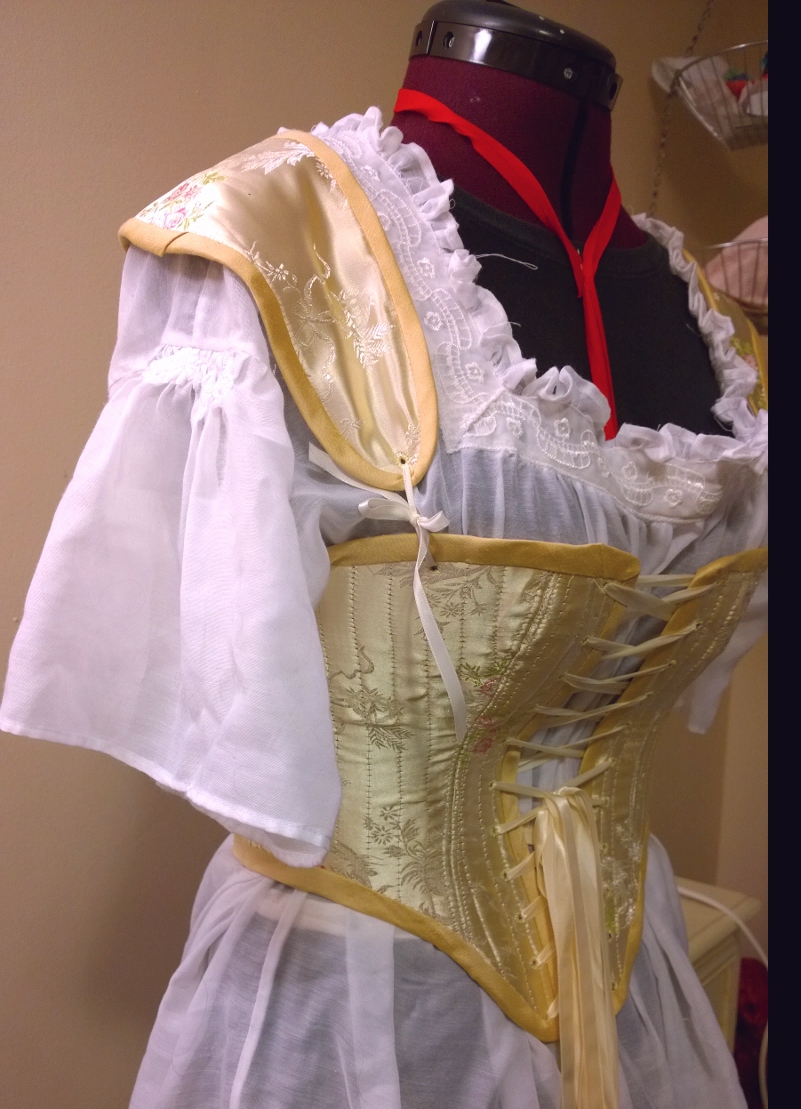
Originally I think I planned to use some sort of pink for the binding, but I didn't really have anything on hand that I liked. However, as I was digging through my fabric stash, I found a really cool gold material. I'm not entirely sure where it came from or what the fiber content is, but it seems to be at least a good quality mock silk duponi.

The binding was cut on the bias. One edge was stitched to the front of the bodice, right sides together. The binding was thing flipped over and stitched into the interior by hand.

The next requirement of the project was the lacing holes. Originally I hoped to get away with metal eyelets, but I did not have the correct size and color on hand. Since I wasn't buying new materials for this project, this left me with the option only of doing stitched eyelets. Thread eyelets are actually correct for the period, so this wasn't a bad circumstance, especially as by now my hands were up for the stitching. Technically, I could have set my embroidery machine to do machine stitched eyelets, but, as it happened, my husband and I had embarked on a huge Pandemic Legacy marathon and I had just enough time in between my turn to get enough stitching done to move the project along nicely. The eyelets turned out really well, and I was quite happy that this detail, at least, was historically accurate.

Sneak peek of the lacing in action!

The very last pieces required for the corset were the shoulder pads. I did these with fewer layers than the corset itself to reduce weight and bulk. After all the work of the corset, doing the little binding and few eyelets required for the shoulder straps was a breeze!

And then, finally, the Tudor corset was completed!
I am tremendously happy with how this project turned out. Although there are a few details I would do differently if I had the budget/time, I would not change hardly anything if I had to repeat this piece with the same constraints.

This is my favorite detail shot!

And even though the corset will not be seen when I wear the costume, I still really love how pretty it is.
I must say, however, I'm really glad that I didn't know how long it would take to complete this piece, or I might never have begun! Which would have been a shame, because it is so thrilling to finally own a (reasonably) proper Tudor Era corset.
If you are interested in creating a corset of your own, I highly recommend checking out the book "The Tudor Tailor" as it really is a fabulous resource. (Unfortunately, due to my current fibromyalgia and stress-related health issues, I'm unable to take on costume commissions at this time.)
Lookng for more historical sewing tutorials? You may be interested in:
4 comments:
The detail on this are breathtaking! Also, I love how you used materials you already had; makes me want to take a second look at my own stash.
Lizzie,
It's lovely, Cant wait to see it complete and on you. The time period will have much under wraps as was the deal of the day. Think of it as if you went out and bought or even made a bra and panties set.
You will feel beautiful from skin up. I am glad you didn't know it would take so much time. I fear living with health issues is a get thru at your own pace kind of thing. Your not doing commissions anymore. You many never be able to do them again. We all have to make allowances for illness and more. Sweet girl, you and Nate can benefit from your talent. It just takes longer. With your talent I just can't see you wearing work not your own. Hugs!
Hi Elizabeth,
My name is Anuj Agarwal. I'm Founder of Feedspot.
I would like to personally congratulate you as your blog Confessions of a Seamstress has been selected by our panelist as one of the Top 100 Dressmaking Blogs on the web.
http://blog.feedspot.com/dressmaking_blogs/
I personally give you a high-five and want to thank you for your contribution to this world. This is the most comprehensive list of Top 100 Dressmaking Blogs on the internet and I’m honored to have you as part of this!
Also, you have the honor of displaying the badge on your blog.
Best,
Anuj
Hi Confessions of a Seamstress Team,
My name is Anuj Agarwal. I'm Founder of Feedspot.
I would like to personally congratulate you as your blog Confessions of a Seamstress has been selected by our panelist as one of the Top 50 Seamstress Blogs on the web.
https://blog.feedspot.com/seamstress_blogs/
I personally give you a high-five and want to thank you for your contribution to this world. This is the most comprehensive list of Top 50 Seamstress Blogs on the internet and I’m honored to have you as part of this!
Also, you have the honor of displaying the badge on your blog.
Best,
Anuj
Post a Comment