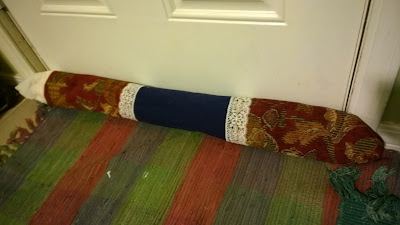
It's 2017 and BRRR it's cold! For Nathan and I, it is our first winter as home owners, and our first time dealing with a heating bill. Overall, it's not too bad, but we're looking to save any way we can, and so I got to work making some draft stoppers.
Prior to starting, I did research and crowd sourcing to figure out the best fill for the stoppers. Being a professional seamstress, I have scraps galore, but I knew I'd need something heavy as well, to keep the fabric log firmly on the floor. Since I needed to make four total, I didn't want to buy the amount of rice necessary, and I also wanted something that would be potentially washable, if necessary.
In the end, my husband got a couple bags of white rocks from the dollar store. I found that about a third a bag was plenty to add the heft necessary.
The first draft stopper I made was sewn as a tube and then stuffed. I found this really time-consuming. For the second draft stopper, I left the long end open instead of the short end, and rolled the stuffing inside a length of felt.
Scraps from my serger made GREAT stuffing!
Rolling it up...
Once rolled, I tucked the felt log into the cute upholstery cover.
The log was a little short, so I added some more stuffing to the ends.
I then folded the edges in and pinned them.
Finally, I sewed the seam shut with a zig-zag stitch. 4 layers of heavy upholstery fabric was a little too much for my machine. Next time I think I'd like to insert a zipper, to make the cover removeable for washing.
But all in all it makes for a pretty cute draft stopper at our back door!
Here is the stopper I made for our living room. My original plan was to slide it under the door, hence the long seam down the middle. However, it didn't fit.
Since my original plan for this doorstopper didn't work, I needed to figure out another way to keep this draft stopper in place despite it being the most heavily used entrance in our home. Velcro did the trick beautifully! (Ideally I would have sewn the Velcro on before stitching the tube together, but I didn't think of it. So there will just be a lot of tacky glue holding it on!)
Since I already had the majority of the materials, I spent a whopping $0.33 per stopper for the rocks. If you don't have fabric in your stash, I recommend checking out the remnants bin at your local fabric store. Each remnant will be at least 44 inches long (selvage to selvage), so you only need to make sure you have a remnant of at least 1/4th a yard for the width.


