Tuesday, December 19, 2017

I Heart Embroidery

I am addicted to embroidery. Embroidered fabric, embroidered clothes, embroidered home furnishings, embroidered towels...extra threads on fabric make my heart sing! I got my first embroidery machine almost four years ago, and it didn't take me long to figure out that I could manage a little embroidered towel business, even when my health was unpredictable. I love offering a wide range of whimsical designs (largely sourced from www.urbanthreads.com)


I use the 4x4 Brother PE400, which is a fantastic machine for the price. I hope to get a machine with a larger embroidery field at some point, but I'm really pleased and astonished at how much use I've gotten out of this machine--several hundred towels, as well as many other fun projects and costume embellishments.


This year I even started stocking some of my towels in a local shop, where they have done very well. It's definitely cool to walk in and see items I made artfully displayed among other awesome products! (The Twisted Root, Hamel, MN)


And I wouldn't sell the towels if I didn't love and use them myself. Here is Nathan, demonstrating that even dudes can get on board with some clever towels.


I am currently running my very last sale of the season, and I wanted to invite you to come on over and visit! I try to minimize using this sewing blog for towel promotion (other than the widget in the scrollbar). However, this is the final sale of the year, and it's for everyone who finds themselves scrambling to get those last few gifts on their list. Not only do I have a variety of designs, Christmas and otherwise, but I'm also offering a discount of 15%, today only! (Normally each towel costs $6.99) 

(Although I personally don't tend to procrastinate on Christmas gifts, I do on other things, so I offer this sale in the spirit of solidarity as well as marketing ;) )

Even if you're not in the market for more shopping this year, I'd love to invite you to come on over and take a look at my little shop! And, if you like, you can also follow my photos of this adventure on instagram or Facebook, or sign up for my mailing list (the most I'll visit your inbox is once a month, but usually less than that).

Friday, December 8, 2017

My DIY Master Bedroom Makeover (For under $75!)

Because it isn't strictly sewing (or even very much about sewing, although there is a quilt), I posted about my recent bedroom redecorating project over on my personal blog. If you're interested in such things, you may enjoy checking it out!


More photos and notes at elenatintil.blogspot.com. 

Friday, December 1, 2017

Green Corset - Part 3


Here we are! The final photos of the finished corset (which I like to call the 'Slytherin Green Corset'). It was quite an adventure stitching this creation, but I'm very happy with how it turned out!


It's quite difficult to sew creations like this and then send them off. I took a bajillion photos of this one.


Here you can see the lace and embellishments I added.

Wednesday, November 29, 2017

Green Corset - Part 2


Corset-making is an intense process, but it is so cool to see the finished piece come together. Part 1 covered the initial construction and busk insertion. Part 2 will chronicle the rest of the process.


Having completed two fittings and established the proper fittings of the corset, I now needed to cover the inside seams. I made bias tape out of black satin and stitched them down.

Monday, November 27, 2017

Green Corset - Part 1


Corset-making is an art of its own. One can be a fabulous costumer, and yet know nothing about crafting corsets. I am still very much a novice in this area, but I did complete a project for a friend this past year that I am pretty proud of.


This corset is loosely Victorian in design, although I'll admit to giving it plenty of modern flare in order to make finishing the project on time manageable! And, for historical accuracy's sake, I should also point out that the Victorian era was quite a long one, with the shape of the corset changing from decade to decade. I use the term "Victorian" here only to really set it apart from the Tudor corset I did previously.


I began the project by padding out one of my dress forms to my friend's measurements. Although I would do fittings in person, making the corset was helped tremendously by having a fairly close body double.


I needed this to be a time economical project, since I knew that even with time-saving methods it would still end up being fairly involved. Therefore, the corset is only three layers thick, and thin layers at that. A gold/green brocade, a thin interfacing, and a green poly-satin lining. I knew it would be easiest to fit the corset if there was one seam per section, rather than separate seams for the brocade and lining, so I stitched all the pieces together as though each brocade and satin piece were merely the front and back of the same piece. I'm really glad I did this, because it made the fitting process so much simpler.

Thursday, November 2, 2017

Eowyn Coat


Several years ago I was given a length of textured brown fabric that struck me as being perfect for a replica of Eowyn's brown coat from "The Two Towers." I got a coat zipper and a bit of cheap brown fur and whipped the coat together. It was a little tricky to piece out all the necessary pattern sections, but I managed to pull it off! And, if I recall correctly, this was my first time working with faux fur.

However, despite the fact that I made this piece over twelve years ago, it has never been photographed! I meant to wear it during a photoshoot with my sister the other week, but the heat soared and there was no way I was wearing this ensemble in 70f weather! The coat pairs well with a medieval undertunic and surcoat in my wardrobe, but both of those pieces are made of synthetic fabrics so it is a very warm costume overall!

Perfect, however, for this past Tuesday, which was wet and frigid. It was also what I like to call "National Costume Day", and Chipolte gave out $3 burritos to those who went in costume.


No, I didn't bring the sword into Chipolte. But I had to get a few photos with it! And my Jedi Master husband, of course.

Eowyn's original costume does not include a zipper, of course, but I deliberately wanted to make a coat that had some actual practical function. I'm planning to keep it handy and see how else I can use it this year. It's quite cool to wear!

Tuesday, October 3, 2017

Sewing Photography Tips


If you are a seamstress who wants to boost your profile on social media, you need good content--and you also need pretty content. Today we are going to talk about how to take good photos that do your sewing talents justice. And don't worry, we're going to do it the economical way!

First, my personal background. I started photographing my sewing projects almost ten years ago. While I am still constantly learning more about photography, I will say that my pictures have come a long way. In this article I am going to share with you many of the tricks I've learned about photography in general, and photographing sewing projects and costumes in particular. Some of what I've learned has come from trial and error, other bits are tips from friends, and plenty of the info comes from many hours spent reading other photography tip blogs. Indeed, I would particularly like to highlight this Sewing Photography post by Tilly and the Buttons, as it served as a significant jumping off point for many of my photographic advancements.

Monday, September 11, 2017

Why I Sew (and why I don't)


I wish that I could show you the actual video above, because it explains so much about my obsession with sewing. However I don't have access to it right now, so I'm going to explain to the best of my memory. Up there is a screenshot of me shortly before my third birthday. I am taping thread onto fabric. "What are you doing?" my mom asks. "I'm sewing," I say. "Like Wendy in Peter Pan."

The weird thing, is that I have a very strong memory of this, but it isn't in the family room, it's up in my bedroom. So the taping thread on things--that was happening a lot. I saw Wendy Darling sewing in "Peter Pan" and I desperately wanted to do whatever it was she did. 

That compulsion has never left me.

myself and my sister wearing very early creations


 I was about five or six when I was first allowed an actual needle and thread, and a year later I had convinced my mother and grandmother to give me a few lessons on the sewing machine. I utterly refused to have anything to do with patterns ("No one is going to tell ME what to do!") and progressed with learning the hard way.

Tuesday, August 1, 2017

My NEW Belle Gold Gown Design

Yesterday, one of my friends sent me the link to a really excellent article discussing Belle's Gold Gown from the new Disney "Beauty and the Beast." I felt that it had a fantastic rundown of why so many people were unsatisfied with the dress that Emma Watson wore, especially in comparison to the general approval (corset aside) of Lily James' Cinderella dress.

I found myself inspired by this blog post to try my hand at my own redesign of Belle's gown, applying the principles discussed in the article.

Click Photo for Full Resolution

I really focused on structured simplicity, and dimensional texture. The largest visible surface of the gown is a smooth, creamy satin. Apart from the skirt gathers and the structure panels, this overgown is quite deceptively simple. In this, I was highly inspired by the simple lines of the infamous Red Gown from "Outlander" (I haven't seen much of the show but the costumes are gorgeous. While the Red Gown had some controversy, I felt that many of the reasons it worked for that show would also make those elements work well for Belle. And I do feel that Belle's gown didn't need to be laden with yards of frills and ruffles, as common for the period.

However, it does need some special princess details and embellishments to add depth. The Cinderella dress did such a lovely job with layering sheer fabrics in the skirt, that I felt a similar approach would work very well for Belle's undergown. The lines of it are simple, but it has several layers of sheer fabrics in shades of yellow, cream, and shimmery gold.

The sleeves were the most difficult part for me. I don't feel that bare arms work either for the weather, or the time period. No woman of good reputation would wear short sleeves in any situation at that time period, even for an evening gown. And in purely practical terms, if the hairy Beast is wearing a full coat and vest, then Belle would be absolutely freezing in that room without sleeves.

However, I've seen a lot of redesigns that put period sleeves on Belle and I never feel that they look quite right for her. This is absolutely because of all the years of seeing her in her anachronistic gold gown from the animated film! So I came up with a design that is a compromise between the two with a fantastical element. Instead of giving Belle gloves, I gave her sheer, metallic net sleeves, with some frilly lace on the shoulders that is reminiscent of both her animated gown, and the frilly lace worn at the elbows on dresses of the period. I felt this created uniquely magical "Belle" sleeves, while still fitting the requirements of time and place.

I know this redesign won't be perfect for everyone, and I may try another design at some point, but for today, I'm pretty psyched with what I came up with.

You can read my further thoughts on the 2017 Disney film here.

Friday, June 16, 2017

My thoughts on the Costumes of the 2017 "Beauty and the Beast"


First of all, to not be redundant, let's see what the internet is already saying about these costumes! In my research I was not able to access the multiple video interviews on the topic, due to my deafness and lack of subtitles on said videos. So they will unfortunately not be a part of my discussion here. However, I did find the following interesting articles:

Fashionista's wonderful interview with designer Jacqueline Durran includes a variety of interesting details, particularly in how they balanced the historical influence with the demands of the story.

People Movies also interviewed Durran, and their article includes additional details, as well as Durran's design sketches. Further design sketches were originally released on Entertainment Weekly here and are a treasure trove for those looking to understand and recreate these pieces for cosplay. While you can see more of the sketches at the above link, I wanted to share my favorite here. (I'm not entirely clear on whether these sketches are her original designs, or drawings of the finished product done for promotional purposes. If anyone can clarify this, I'd be grateful for the details!)

Monday, May 29, 2017

Tudor England Era Corset

I have been obsessed with the clothing of the Tudor era ever since I was a young girl. In fact, at one point in time, I hand-sewed a self-drafted gown of blue velvet, at which time I was perhaps 12 or 13. (Yeah, I was very geeky.) And the very first costume I ever made with a pattern was this (laughably inaccurate) Purple Tudor Gown.

In those days, it was difficult to find reference books detailing the historical costume of the period, so I had to make do with guessing from portraits. Nowadays there is a significantly larger trove of details, in particular the excellent book "The Tudor Tailor" by Ninya Mikhaila and Jane Malcolm Davies. Getting this book as a Christmas gift from my parents was a long-awaited dream come true. Now all that remained was to complete a full-Tudor ensemble...

When creating a historical costume, one must build from the foundations up, to ensure the correct shape and sizing of each piece. I started my Tudor Ensemble with this White Shift. Next, I needed to construct a corset. This ended up being a much longer project than I intended. Between health and home responsibilities, it took me about 9 months from start to finish - closer to a year if you count writing this blog post! 

(While the historical term is 'stays' I am so used to calling this a corset, that I hope stricter historians will forgive me for using that term in this piece). 


Although I have done boned bodices before, this was my first piece that really worked as a proper corset. Although I largely followed the pattern in the Tudor Tailor for shaping and structure, I had to make some additional modifications to accommodate a significant curve ratio. Thus my corset is not nearly as flat as the fashionable style of the period. 

Tuesday, May 23, 2017

The Downton Experience - Part 3

The time has come, my friends, to celebrate the final post of the Downton Abbey costumes that I was able to see in person. If you are behind, you can check out post #2 here! 

As before, all photos were taken by my husband, Nathan Hajek, and the clothing details were sourced from the pamphlet handed out by the Exhibition. 


My favorite Downton dresses usually involve velvet or beading, so it is no surprise that this piece was one of my favorites of the exhibition. Worn by Edith in Season 5 (1924), it features a gorgeous burnt orange velvet and a rose-hued slip of crepe silk. The draped velvet is the highlight of the dress, but a closer look reveals exquisite embellishment in a few key places.

Tuesday, May 9, 2017

Emma Swan's Wedding Dress

Sorry it took me so long to get my reaction up. Okay, two days isn't really that long, but gauging by the spike in visits I've had over the past 24 hours, I have a feeling some people are hoping for my reaction to this big OUAT costume!


________________________


If for some reason you haven't caught up with "Once Upon a Time," you ought to skip this post as it will definitely spoil some big things for you.

________________________


Friday, May 5, 2017

Refashioning is less of a modern fad than you'd think

"Refashion" and "Upcycle" are trending words these days. The ranks of Instagram and the blogosphere are swelling with people who give thrift store finds new lives by radically remaking them into trendy (or timeless), well-fitting outfits.

But did you know that, rather than being a new fad, this mindset was actually the norm for the large part of history? In the past, a garment would be remade over and over, sometimes for generations! When there finally was no longer enough material for a serviceable garment, the fabric would then find its next life as a quilt, rug, or rags. This is why we actually have relatively few examples of historical garments surviving today.

One blogger I follow is remaking a historical gown into another historical garment, and discusses what it is like to follow the footsteps of history. Although you see this happen regularly with modern clothing, it is not often documented with costumes because we modern costumers dislike pulling apart our works of art. Anyhow, I found it interesting and worth a look!

Friday, April 28, 2017

The Downton Experience Part 2

This is a multi-part series on my trip to the Dressing Downton Exhibit at the Mall of America in January. You can check out the first post here!

All costume facts are sourced from the pamphlet provided by the exhibit.


This burgundy day dress is made of Moroccan silk and worn by Lady Mary in Season 6 (1925).

Saturday, April 15, 2017

The Case of the Missing Costumes

I had a scare the other week wherein I thought I had lost my very favorite costumes. As you can imagine, this is a seamstress's worst nightmare, and I really thought that I was facing the worst.

I'd decided that I wanted to embellish one of my old costumes further, so I decided to dig through my stash and pull it out. To my surprise, this costume (which I had always kept readily at hand) was nowhere to be found! I was annoyed, but not too concerned. We'd moved twice in the past three years, and I figured a box was misplaced somewhere.

That weekend, I asked my husband to hang up a rod in the laundry room so that I could hang up all of my more elaborate ensembles. He did so very sweetly, and also carried in all of the boxes and garment bags we could find that might possibly have costumes, and helped me hang them up. We got them all nicely arranged in chronological order, but... that one costume was still missing!

And then I realized...there was another costume I couldn't find either! I was a little concerned now, because we'd gone through our whole house, but I figured they were still at my parents. Costumes keep coming out of the woodwork over there. Every few months my parents would tell me "We have more costumes/fabric to bring over, do you have space for them now?" It's almost like they raised a seamstress or something.

So, I texted my sister. As I did so, I remembered another costume that hadn't turned up...and this too was one of my very favorite pieces! Curiouser and curiouser.

My sister, however, was quite sure that all the costumes had gotten transferred over to my house. She promised to come and help me look the next day. We looked through every possible place in every possible room. And... still, no costumes.

"I'll check mom and dad's again," said my sister.

I remembered another missing costume, this one the piece that I had put over 30 hours into. I was starting to have visions of a pile of costumes lost in a parking lot during some move.

My sister texted me the next day. "No sign of them here, I looked everywhere!"

Now, my sister is an incredibly thorough person, so I knew she had done a diligent job. I chose another costume to begin embellishing at this point in my free time (see my sewing instagram for photos), and tried not to stress too much. There was still a remote chance that the costumes had gotten stored at my grandparents. I also decided to deep clean the bedroom. I didn't think the costumes were in there, but...well I had to do something, right?

Then I got another VERY excited text from my sister, who humorously relayed how she'd found the costumes in the garage after checking it for the umpteenth time. The label on the box had been somewhat misleading, and she'd thought it was another batch of clothing. BUT. It wasn't. It was my special costumes and I was so thrilled! Turns out, there was also ANOTHER box of fabric. (Oh mom and dad. I'm so sorry....)

Anyhow, no heart attack warranted, my costumes were SAFE, and my sister triumphantly transported them to my house yesterday. After several years of having all of my pieces boxes up and hidden in garment bags, I finally have everything airing out, in easily referenced order, and all of them in the same room. (It's also the basement room that we had just made floodproof, so once I get a transparent dust curtain in place, my costumes will be very well protected.)

I think only my fellow seamstresses will understand what a source of relief and comfort this is to me.

For other seamstress confessions, click here!

Saturday, March 18, 2017

The Downton Experience - Part 1


Downton Abbey will always have a dear place in my heart, partially because it was the décor inspiration for my wedding, and partially because it was a major piece of getting this blog going. But even without these elements, I still would have been psyched to hear that the Downton Experience was coming to the Mall of American in Minnesota. (Sorry, folks, it's gone now.)

Actually, I totally freaked when I found out. Actual Downton Abbey costumes coming to Minnesota so I could see them in person? Seriously? A dream come true! (Probably the only thing I'd get more excited about would be if the Star Wars costume exhibit ever came here. I would die of happiness.)

Let's clarify - there are two Downton Abbey costume exhibits going around, one bigger, one smaller. The one at MOA was the smaller one - but still well worth the price of admission! There were 27 costumes, all of which you could see at extremely close range (most were not even behind glass).

And yes, photography was allowed, so I am going to show you all of the glorious details! (But I still recommend going yourself! $10 for admission, or less with a groupon deal!)

My husband and I attended as a celebration of our 3rd Anniversary. By this time in our relationship, Nathan has a pretty solid footing on which to enjoy costumes himself, and he was well equipped to take photos. Actually, I was planning to take photos myself, but then upon entering the exhibit, Nathan told me "Now Honey, you just enjoy yourself. I'm going to take photos, just let me know what you want me to take."

"Everything!" I told him. "I'll let you know if we need detail shots of anything!"

He took almost 100 photos. So we're going to break this up into a few posts.

The exhibit thoughtfully provided a lovely full color brochure for the attendees, detailing the materials for each costume, along with when they were worn and by whom. My only qualm with this brochure is that I would have liked more information on what garments were made by the production, which were rented, and which were authentic vintage. A few accessories were marked as vintage, but otherwise there was no indicator of manufacturer.

Click any photo to see it in full resolution.


A silk and wool dress, worn by Mrs. Hughes in Season 2 (1920). Upon closer viewing, there is a lot more embellishment on this dress than you would expect.

Wednesday, March 8, 2017

Ode to an Iron


The Oreck iron above was my faithful companion for fifteen years. Given to me back when I was a young teen with grand sewing ambitions, I loved the cordless feature, the auto-shut-off safety, and the expansive heating plate of the iron.

I also loved that it lasted for 15 years.

Last week, after undergoing a cleaning, the Iron finally gave up the ghost. We rushed it to our local Oreck store, begging them to save it, but alas, no hope. Once the heating element burns out, an iron is unsaveable.

The Oreck blue is a highly rated but no longer manufactured product. You can still find it on eBay, however, so we are trying to track one down for me. It's been my perfect iron, and it would be tough to replace it with anything other than an exact clone.

Those who don't sew often find it surprising how physical the art can be. A big part of this is the heavy role ironing plays in creating a perfectly stitched piece. (yes, pun intended.) There is almost nothing I create with my sewing machine that doesn't involve some level of ironing, whether my elaborate costumes requiring protective cloth over delicate velvet and silk, or pressing out the stitched corners of the floursack towels for Whimsical Kitchen. (Almost) everything looks better ironed.

For now, I'm stuck using my little travel iron. It's easy on my arms, and indeed, I bought it for use on my bad fibro days. However, as you can see above, it is tiny compared to the Oreck, and I find myself greatly slowed.

I never thought an iron would make me cry, but seeing this faithful companion leave has made me quite misty-eyed. Farewell, old friend.

Wednesday, March 1, 2017

How to Make Jedi Robes from Curtains - Part 3

Time to sew the sleeves and hood to the body of your Jedi Robes! (Missed Parts 1 and 2?  Part 1, Part 2)

(I made Jedi Robes because my family is super into Star Wars, but you could also use this pattern to make basic wizard robes.)

Reminder - This tutorial is aimed towards making robes for a child, but you could definitely apply the method for a teen or adult as well, you'd just need bigger curtains (or a sheet or bedspread). You could also just start with plain fabric, but then you would need to add hems and it would take longer. The beauty of this layout is NO HEMMING! Yay!

In Part 3, I will show you how to attach the sleeves and hood to the body.


The robe body consists of one piece right now, and the only seams you need to sew on it are the shoulder seams. Match each front shoulder piece to it's back shoulder piece and sew. I used a conventional 5/8ths inch seam allowance.  Remember to backstitch to secure the ends.

Tuesday, February 7, 2017

How to Make Jedi Robes from Curtains - Part 2

Time to sew the Jedi Robes together! (Haven't cut yours out yet? Learn how over at Part 1)

(I made Jedi Robes because my family is super into Star Wars, but you could also use this pattern to make basic wizard robes.)

Reminder - This tutorial is aimed towards making robes for a child, but you could definitely apply the method for a teen or adult as well, you'd just need bigger curtains (or a sheet or bedspread). You could also just start with plain fabric, but then you would need to add hems and it would take longer. The beauty of this layout is NO HEMMING! Yay!

In Part 2, I will show you how to start sewing the pieces together.


First sewing step is stitching the sleeve seam. The bottom of your sleeves should already be hemmed, so you are going to match the hemmed edges up (right sides together), and stitch all the way to the beginning of the armhole curve (as shown below).

Thursday, February 2, 2017

How to Make Jedi Robes from Curtains - Part 1

Ever so slowly, I am working my way toward populating this blog with posts again. A lot of the sewing I've done this year has been small projects, to accommodate my limited health. However I am gradually increasing into more interesting projects, so there should be exciting new stuff to watch for in the coming months.

Today, I am going to talk about how I made Jedi robes for my little nephew in just two hours! Honestly, I could have done them in an hour if I wasn't taking photos and planning this blog post at the same time! But I did, because I just had to share this super easy project with you all!

(I made Jedi Robes because my family is super into Star Wars, but you could also use this pattern to make basic wizard robes.)

This tutorial is aimed towards making robes for a child, but you could definitely apply the method for a teen or adult as well, you'd just need bigger curtains (or a sheet or bedspread). You could also just start with plain fabric, but then you would need to add hems and it would take longer. The beauty of this layout is NO HEMMING! Yay!

Jedi robes are not very fitted, and this project is made to be unlined, but not unravel, so this is an ideal project for someone with basic sewing skills.

In Part 1, I will show you how to select which curtains to use, and how to cut them out.

These robes are unlined, so I recommend picking out a curtain with a bit of weight and body to it. You can pick any material you want. I used polyester because it is what I had on hand, but a rough, natural looking weave would be more accurate to the costumes worn in the movies.

Bonus tip - most thrift stores have sale days, or have categories or tag colors on sale on different days of the week. Call ahead and find out when you're most likely to find curtains on sale, in order to get the best possible deal!

To get the dimensions of your curtain, take your model's floor-to-shoulder height + arm length. This is how long your curtain needs to be. The width is more flexible - it should be 2-4 times the circumference of your model's chest (depending on how flowing you want the robes to be). If you are working with very narrow curtains, you can get two and sew them together down the long end, to create a center back seam. The hemmed edges will create a nice finished seam on the interior.


The first step is to fold the curtains in half, lengthwise, right sides together. THEN, take each edge and fold it back over, so that you have four layers, with the front, finished edges lining up with the center seam, as shown above.

Thursday, January 19, 2017

Draft Stoppers

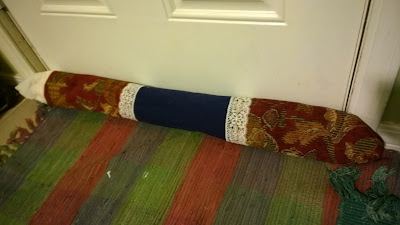
It's 2017 and BRRR it's cold! For Nathan and I, it is our first winter as home owners, and our first time dealing with a heating bill. Overall, it's not too bad, but we're looking to save any way we can, and so I got to work making some draft stoppers.


Prior to starting, I did research and crowd sourcing to figure out the best fill for the stoppers. Being a professional seamstress, I have scraps galore, but I knew I'd need something heavy as well, to keep the fabric log firmly on the floor. Since I needed to make four total, I didn't want to buy the amount of rice necessary, and I also wanted something that would be potentially washable, if necessary.

In the end, my husband got a couple bags of white rocks from the dollar store. I found that about a third a bag was plenty to add the heft necessary.


The first draft stopper I made was sewn as a tube and then stuffed. I found this really time-consuming. For the second draft stopper, I left the long end open instead of the short end, and rolled the stuffing inside a length of felt.


Scraps from my serger made GREAT stuffing!


Rolling it up...

Once rolled, I tucked the felt log into the cute upholstery cover.


The log was a little short, so I added some more stuffing to the ends.


I then folded the edges in and pinned them.


Finally, I sewed the seam shut with a zig-zag stitch. 4 layers of heavy upholstery fabric was a little too much for my machine. Next time I think I'd like to insert a zipper, to make the cover removeable for washing.


But all in all it makes for a pretty cute draft stopper at our back door!


Here is the stopper I made for our living room. My original plan was to slide it under the door, hence the long seam down the middle. However, it didn't fit.


Since my original plan for this doorstopper didn't work, I needed to figure out another way to keep this draft stopper in place despite it being the most heavily used entrance in our home. Velcro did the trick beautifully! (Ideally I would have sewn the Velcro on before stitching the tube together, but I didn't think of it. So there will just be a lot of tacky glue holding it on!)

Since I already had the majority of the materials, I spent a whopping $0.33 per stopper for the rocks. If you don't have fabric in your stash, I recommend checking out the remnants bin at your local fabric store. Each remnant will be at least 44 inches long (selvage to selvage), so you only need to make sure you have a remnant of at least 1/4th a yard for the width.