Thursday, August 30, 2012

Let's Take a Look at My First Show

That is, the first theatrical production that I costumed. This was back when I was 18 and my sister had gotten the lead role of Queen Esther in our church's children's musical. They asked me to do the costuming, and somehow I worked it all out in between classes. 

I was more than happy to do so, of course, for what big sister is going to pass up her chance to dress her little sister as royalty? 


I created seven costumes for the show, and helped organize the others from the existing costume wardrobe.


My sister's gown was definitely my favorite part of the project, and still remains something I'm pretty proud of. It contained three pieces, a cream lace undergown (with slip), a pale pink embroidered overgown, and a dark purple chiffon robe.

It was also my first time putting a serious train on anything...


Is it period Persian dress? Not exactly, but it worked well for the production and the number of layers allowed my sister to create a variation of looks for her different scenes.


This picture includes a good look at the shape of the sleeves, and a peek at one of the purple dancing costumes I did.

Long time ago, but there are still things I'm pretty happy about here.

Tuesday, August 28, 2012

Katniss Fire Dress Redesign

I knew pretty early on that we weren't going to get an accurate reproduction of the jewel fire interview dress in the "Hunger Games" movie. The top of it made a brief appearance in the early trailers and that was enough to show that there were no jewels studded on the bright red gown. The reason was obvious - sewing on that many jewels by hand would be an intensively laborous task, and the budget apparently couldn't handle it.

I was fairly pleased with their solution - loved the jewel stickers on Katniss's face - but still missed seeing a good rendition of the gown that most captured my imagination in the series. The solution of course was to draw up my own version. I completed the sketch back in November, but due to loosing my tablet pen, was unable to color it until today.

It was well worth the wait, don't you think?


The Girl on Fire by ~Elenatintil on deviantART

Sunday, August 26, 2012

Fairy at Prayer


Fairy at Prayer by ~Elenatintil on deviantART

Did this piece yesterday and was so happy with how it turned out, that I thought I'd share it with y'all.

Saturday, August 25, 2012

Costume Commission Queue full through Halloween!

In the last few weeks I've gotten an enormous flood of commission queries and orders and I can now say quite definitely that my costume queue is full through October, 2012. If you have e-mailed me prior to today with a request for a costume in time for Halloween, I'll be able to do that. Anything that hits my inbox from here on out will not be guaranteed finished and delivered until November 30th, 2012 or later.

This means if you want a costume in time for Christmas, get on the list now!!!

Tuesday, August 21, 2012

Oscar de la Renta Spam on my Tumblr

Spent too much time working and not enough doing blog posts today. However I did go through the Oscar de la Renta tag on Tumblr and reblogged a ton of my favorites. There are some really gorgeous designs out this season! So if you're looking for a dash of gorgeous, head on over to elenatintil.tumblr.com and enjoy!

Saturday, August 18, 2012

How WE Benefit when Michelle Obama Wears Pricey Clothes

High profile political icons like Michelle Obama and Princess Kate often get a lot of flak from the media due to the high price-tags on a lot of their clothing ensembles. Awhile back I wrote a post on Facebook talking about why their choices are good for us all, and I thought the readers of my blog might find it interesting as well.

So... why is it okay for people like Princess Kate and Michelle Obama to shell out a lot of money on clothes? 

I see them getting a lot of flack and it kind of bugs me because they're wearing those clothes for a reason. They're representatives of their nations and need to look the part. But it's more than that. Women that are or are married to the head of state (or their heir) typically try very hard to frequent the designers of their own countries. All the money they spend goes right back into their own economies - AND it brings global awareness to those designers, which also brings more $$$ into their country's economy.

Yes. You heard me. What Michelle Obama wears (if she's picking American designers, which I believe she is) is good for the American economy.

And it's not just the high end designers that benefit. When Kate Middleton wears a popular outfit, lower end designers immediately rush to make cheaper replicas which are eagerly bought up (seriously, the numbers are crazy) and further fuel the economy of all countries with their eyes on Britain (yep, that's America too, because Anglophenia is pretty crazy here...)

So next time you hear about a $7000 jacket, take it with a grain of salt, because it's doing a lot more work than a stimulus plan.


Thursday, August 16, 2012

French Peasant Fantasy Gown


One of the things for which Marie Antoinette is remembered (and ridiculed) is her pastime of "playing peasant." She had a village built, and she and her courtiers would go down in "peasant clothes" and pretend that they were shepherdesses. It was a total fantasy (Marie Antoinette had the sheep perfumed because their real smell was too stinky), but a pretty beautiful one. You can go to Versailles today and find the play village in the gardens, just as it was 250 years ago. Or you can rent the Kirsten Dunst "Marie Antoinette" and see the village in the later half of the film, as they went on location rather than building sets.


Anyhow, it's a captivating idealistic life that could never really exist, and is the concept that I drew on in creating this dress. The cut is far too simple for the nobility, but the embellishments are much too fancy for a commoner. But it does have historical roots, as it fits very much in the time period that Marie Antoinette was playing peasant in.


Monday, August 13, 2012

Rainbow Dash Ballgown Part 2

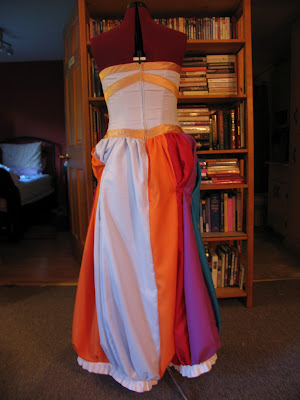
The main pieces are cut and assembled, so now it's time to add some glitz to this pony gown!


I used the top of the bodice to trace a template for the gold edging, which was cut in three pieces, then sewn together. The top edge was sewn to the bodice by machine, the bottom edge turned under and sewn by hand.


Cutting out another template for the criss-cross gold bands.


Pinning down and turning the edges under...


Here is another really good example of the difference between what I term 'costume quality' and 'tailor' quality. In this piece, 'tailor' quality is the hand stitching I did on the upper gold edging. 'Costume' quality is how I secured the lower crossing bands - I machine stitched down the edges. This means that if you look closely, the stitches are visible, but it doesn't really have much effect on the structure of the costume. On stage this wouldn't be noticeable, at a convention or for a photoshoot it really depends on your preference.


It's one thing on the dress form...

And another in action!


Doesn't she look rocking? I love how she styled the costume with the jewelry, wig and sandals! You can see more of the final ensemble at the cosplayer blog here!

Saturday, August 11, 2012

Rainbow Dash Ballgown Part 1

Towards the end of June I got a rush commission for the local comic book/geek convention. It was my most unusual project so far, but pretty fun and the first piece of mine to go to a convention! 

My customer is a fan of the show "My Little Pony" (it's actually legit fun, don't laugh!), and wanted a dress that evoked the look of the character Rainbow Dash. She found this Reference Art (By ponymonster) piece of art to use as a guideline and I thought it was doable. 


This project was my first time using a new method of pattern-making... the duct tape method. It actually worked surprisingly well and I got a very nice fit - absolutely essential for a strapless dress!


Pretty self-explanatory, but if you want more detail you can check out the video I linked to above.


Bodice is stitched and I'm draping the petticoat.


I had only a select amount of ribbon, so I had to be careful to match the hem's size to it exactly.


Looking nifty...


Then I sewed the rainbow.


And draped it...

And draped it some more... I'll be honest, I was not thrilled with the method I used here. If I'd had more time or been commissioned to do a more exact replica, I would have gotten different fabric (chiffon or organza) and cut it out differently. However, after a couple hours of fussing, I got a workable drape.


I love this boning. You can just sew it down directly to the wrong side of the lining. No messing about with pockets and tubes and bias tape.


I used six strips of boning, laying two on the center back, two on the front, and one on each side. It was exactly the right amount.


Aren't we getting a lovely bodice shape emerging here?

Next: see the bodice finished, the details added, and what the final ensemble is accessorized with!

Tuesday, August 7, 2012

I miss my sewing machine.

I miss my sewing machine.

I've been gone from my house for almost a month, and during that time the only bit of sewing I've done is some quilting three weeks ago. Needless to say, I'm feeling a bit fiber deprived.

However I've been getting tons of commissions which has been fabulous and so as soon as I get back I'll be up to my ears in sewing. Today I met with a customer and discussed exact plans and prices... it's a historical piece so I need to do some more research and come up with a final sketch, but we got some good details laid out.

Thursday I fly home. Friday, if I'm not dead tired, I'll be hopefully sitting down and doing some serious sewing. And I still haven't had a chance to set up my Serger yet...

Saturday, August 4, 2012

How to Make a Needle Book

Today's project is neither flashy nor elaborate, but it's a very necessary piece for any seamstress to have. 

I long ago gave up keeping my needles in a pincushion. They would always disappear into the center, and emerge at the most inopportune time on the other end to prick my fingers horribly. Some people use little wooden or metal tubes to store needles in, but I find these tricky to use when you want to find a particular needle (when they spill, pointy things go everywhere!). Other people use the paper books the needles come with, which is fine until the paper wears out and the needles escape. 

The best solution I've found is the homemade needle book, which you can make from scraps you have around, and embellish as desired. 


You will need:
Sewing machine
Paper scissors
Fabric sheers
Cardboard
Felt (I used a bit from an old blanket)
Ribbon
Fabric for the exterior
Fabric for the interior (should be easy to stick needles through)
Pins


Cut the exterior and interior fabrics into identical rectangles. Stitch the ribbon down the center of the exterior fabric.


Fold the excess ribbon into the middle and pin the interior fabric over, right sides together. Sew one long side and both short sides. You now have the needle book casing.


Turn casing right side out and press. Cut identical squares of the cardboard and felt to fit inside the casing, with room to stitch the raw edges and to sew a seam down the binding groove.


Stick the cardboard and felt in, with the cardboard against the exterior fabric and the felt on the interior. Sew the center seam down the binding groove. Turn the raw edges in and hand stitch together.


Add needles in desired order.


Fold and use excess ribbon to tie shut. Hey presto, you have a needlebook!

I used a scrap of the velvet I dyed for Regina's Riding Coat for the exterior fabric, as I wanted to have something I could use regularly from that piece (since I worked so hard to get it that color). You could use any sort of fabric for the cover, or you could embroider or bead a design of your own.