
There are a lot of dolls most of us remember from growing up. Barbies. American Girl Dolls. Polly Pockets. I had all of these, but the dolls that were my absolute favorite, that I played with until they were worn to pieces, were Halfpenny Dolls. (See what they looked like here)
Originally, halfpenny dolls (similar to Hispanic Worry Dolls) were so named because the bits and pieces that went into them were little scraps that cost half a penny or less. Which was slightly ironic because mine came from Hearthsong and cost $25 per family (not counting babies, grandparents ore teenagers, which could be purchased separately). However, considering the hours of enjoyment they gave me, it was probably the best money my parents spent on me until they gave me my own sewing machine. The dolls are the perfect scale for most miniatures, are tremendously portable, and very poseable. The only downside is that after much heavy play, they do wear out, and while the threads and fabrics can be mended, broken inner wires are pretty are to fix.
By the time I grew out of playing with them (which wasn't until I was about 14), I had about twenty of the dolls, and had only lost two of them over a decade of play. My sister had a similar collection.
Recently I thought I ought to look and see if the dolls had changed over the years... only to find to my dismay that Hearthsong no longer carried them. What? The closest equivalent I could find were Sally Mavor's Wee Felt Folk, but these are real works of art and not dolls I'd want to give to a 4-year-old. Time to test and see if I could make my own. I mean, I've only got a couple of years before my niece and nephew will need their own!
The results, which I posted on my Facebook and Instagram, turned out so well that people were asking me for a tutorial. So, here goes!
To make your own halfpenny doll, you will need:
- Pipecleaners (1 for child, 2 for adult)
- Cotton batting scraps
- Fabric scraps for clothes (woven or felt)
- Skin tone woven cotton scrap
- Embroidery floss (skin tone and clothing colors)
- Embroidery needle
- Polyester sewing thread (clothing colors)
- Regular sewing needle
- Fine pens
- Blush colored marker
 |
| Click any photo to see it full sized! |
Although my halfpenny dolls growing up had stitched on faces, I opted for the ease and options of drawn on faces. I used a 005 Prismacolor pen to draw the basic face in black on a skin tone cotton. I wait to add cheek, eye and lip color (if necessary) after the head is assembled, in case anything needs to be tweaked.

For this tutorial, I made a little boy. The difference between adults and children is basically that kids are 50% smaller and require just one pipe cleaner rather than two. I folded the pipe cleaner into the body shape (see next photo) to mark out the hands and feet. Then I unfolded it, made sure the marks were even on both sides, and wrapped the hand sections with a skin tone embroidery floss and the feet sections with the shoe color embroidery floss. I was careful to keep the wrapping tight and even.

Next I folded the body back into shape.

Even with the pipecleaner doubled over, it would still make for a pretty skinny kid at this scale. So here I used the batting scraps to give the body a bit of 'meat.' You can see that I used a bit of light colored sewing thread to hold the batting in place on the arm until I could go over it with embroidery floss or clothing.

Now it's time to assemble the head! I made a little ball from the batting scraps and wrapped the face fabric around it, keeping the folds towards the back of the head where they would be covered by hair. I used regular thread to wrap the fabric tightly around at the neck, and sewed a few stitches through the center of the neck, being sure to pierce the little pipecleaner loop so that the head stays securely on and isn't pulled off by an over-enthusiastic child.

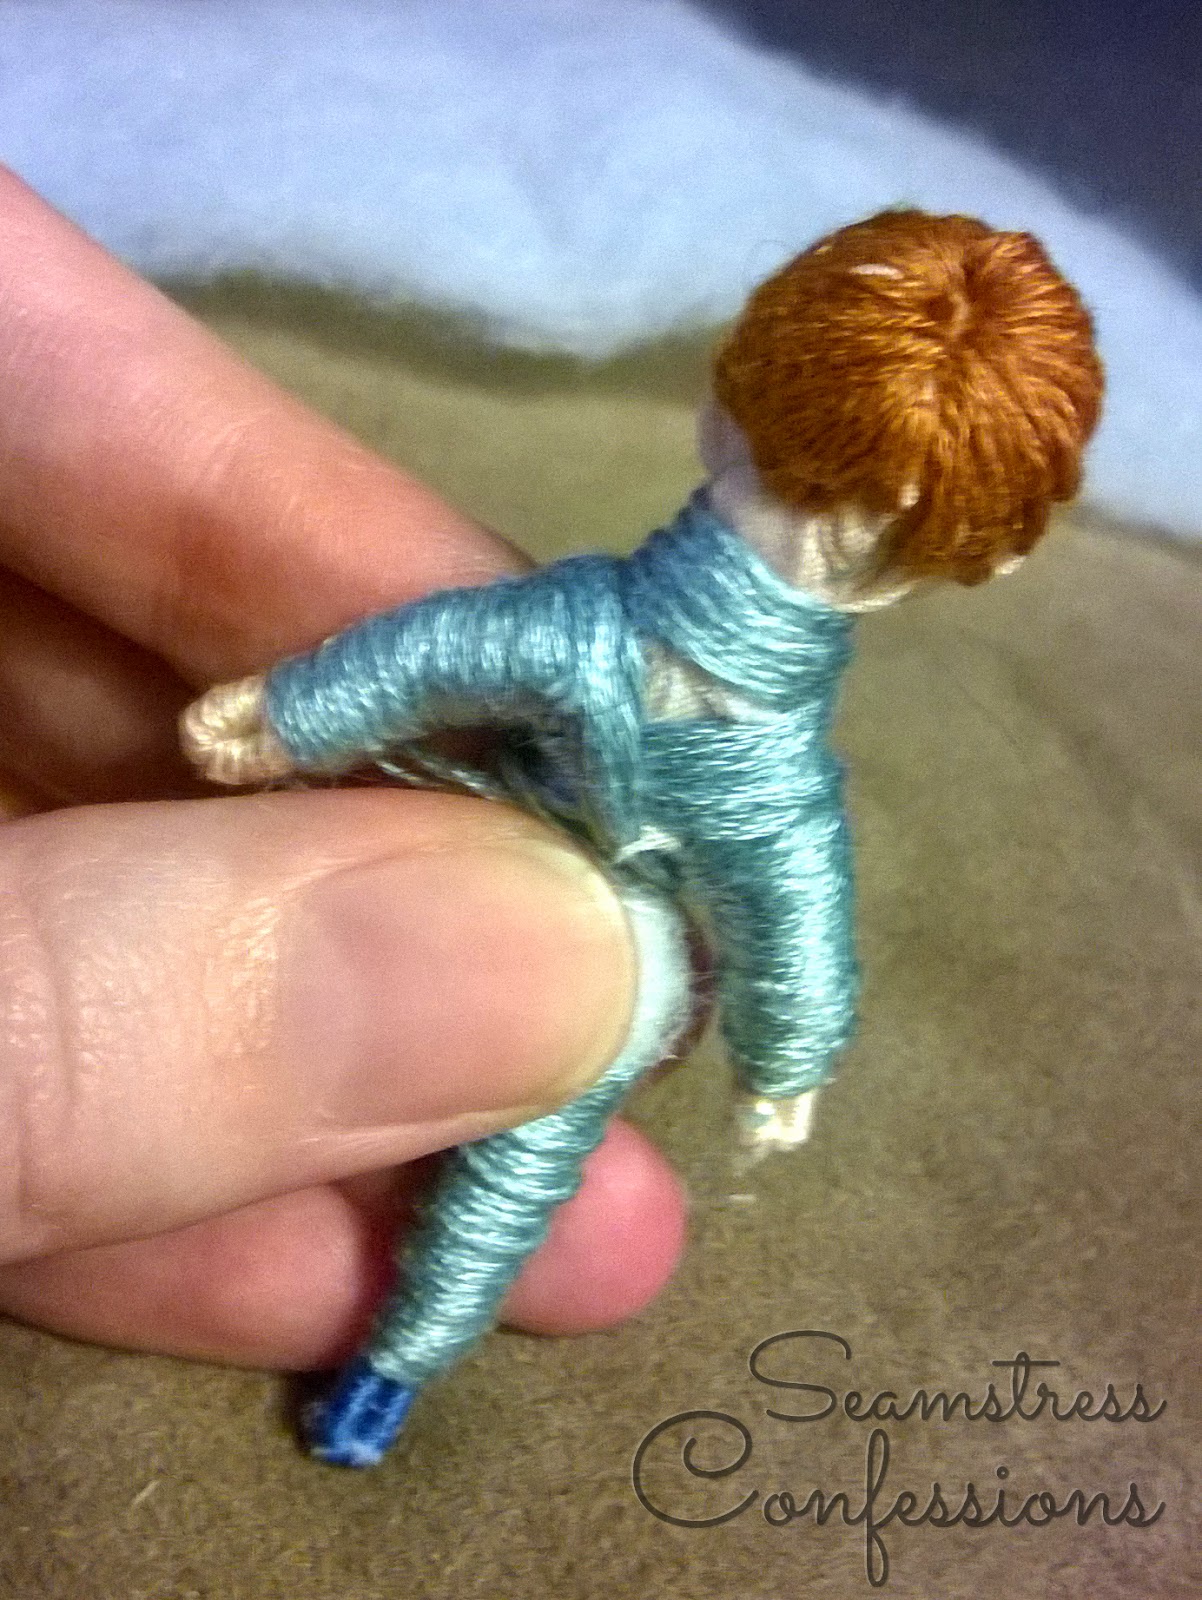
Time to wrap the body! I always started at the hand/food and moved in towards the center of the body, keeping the floss smooth and even. The batting compresses, but I was careful not to make it so tight that there wasn't still a bit of soft give to it.

Once the arms and legs are wrapped, you can wrap the neck. Here you can see I've wrapped nearly all the arms and legs, but not quite, since his clothes will cover up most of the center. For my little girl, baby and mom, I wrapped the entire body. For the dad, I only wrapped the feet, hands and neck, since his clothes covered all the rest.
(Not shown in this photo - the X-shaped wrapping over the torso. See the photo of the little girl below to get an idea of how this looks.)

I wanted to put fray check on the clothes, so I cut them out prior to doing the hair so that the glue could dry while I was working on the hair. You can skip this step entirely if you choose to use felt instead of woven fabric.

Putting on the hair is the most time consuming part of the process, and the hardest on your hands. It usually took me at least an hour to put on any of the hair, with the adults being the most laborious. Use an embroidery needle, pull the hair firm against the head, but not tight, and work from front to back, keeping the sides even and close together.
Tip: have a pliers on hand. Sometimes it is really hard to get the needle head through the layers of fabric/batting/accumulated floss and a little tug from the pliers will make it all go much quicker and safe your fingers much aching.


When sewing the clothes, be aware of how they will go on the doll. Some seams need to be stitched down after the doll is dressed, since there are no buttons/zippers/velcro small enough to work on these little people!

Here you can just barely see the little green I added to my little guy's eyes. There is also a bit of color in his cheeks, although it doesn't show up here. For the girls, I added some lip color as well.

I just used my prismacolor markers from my art kit. I'll have to see how well they hold up over the years and whether they need any touching up after much play.

And here is the full family!

Because I've been so sick recently, I had a lot of time to spend making these wee folk. I did mom/daughter in one day, dad another day, and little boy and baby yesterday.

I'm very proud of the detail in dad's tie.

Mom was the first doll to be completed. For future ladies, I'll probably experiment with more complex hairdos.

My little halfpenny girls growing up always had tiny braids. I couldn't resist making this little lass's a bit longer!

Here you can see how her skirt is attached. I used this technique for a lot of the clothing. I sewed the gathering seam, slipped the fabric on and tucked the raw edges and stitches under, then drew the gathers closed like a drawstring. The stitching is invisible from the outside.


This baby is so adorable it makes me want to squee.

Here you can see the face details a bit better.

And here you can see the backs of the heads, which aren't always quite as uniform as they could be... but eh. My hands were tired.
I hope this tutorial was helpful and easy to follow! If you enjoyed it, feel free to share and pin it!
Now, what should I make next? Teenagers? Grandparents? Or maybe some historical folk? What do YOU think?
4 comments:
WoW! You did a much better job than when I tried to extend my daughter's meager collection of Hearthsong halfpenny dolls with yarn wrapped coat hangers with wood bead heads!
How beautiful your little dolls are...Inspired by my old ones, I am on my way to gather supplies and follow your tutorial. My only question is what the glue is used for -gluing clothing together?
Hope your health is getting better, Gg
HI Gigi! I hope your project goes well! The glue is fray check and is optional - I put it on the edges of the fabric that was unraveling easily to keep it from coming apart. It is not holding any seams together, just finishing off the edges (like serging with glue)
This is a wonderful tutorial, thank you! I still have my collection of halfpenny dolls from when I was a kids--very much beloved even still--and now I'm brainstorming new ones I could make to add to the family.
Post a Comment