Confession: I was really really close to abandoning this blog. Not because I've stopped sewing, but because I now have a mini-seamstress-to-be (I hope!) in the house, and I barely have time to sew, much less photograph and write about it!

However, I have been having a TON of fun making clothes for her and I've been delighted by how easy and low stress baby sewing is. I'd really love to empower more people to try their hand at sewing up some fun things for their kids, so I decided to get a blog post out right now, while so many of us are cooped up at home.
This tutorial is designed for an intermediate sewer who already knows some basics. The entire project uses a zig-zag stitch on a regular home sewing machine.
My daughter is currently wearing 12-month clothes, and I made this dress entirely out of a size medium camisole from Maurices. A smaller or larger child could get more or less of a garment, or you could also use a t-shirt, especially if you want a 100% cotton garment (camisoles often have polyester in them).
The reason I start with an existing shirt rather than fabric yardage is a) most of us have shirts around that we or our spouses have grown out of, and b) you can utilize the hems on these shirts so that you'd don't need to break out a twin needle. Technically you CAN hem knits with a zigzag stitch, but it doesn't look great.
What you'll need:
Sewing machine (ballpoint needle is optional but not necessary)
scissors
thread
marking pencil
paper/cardboard
shirt/camisole to cut up
a knit shirt in your child's desired size to use for pattern
Disclaimer: I was working REALLY fast--I did the entire project and photos during one nap. In the interest of getting this post done, I've opted NOT to edit the photos. However, I think it's all very clear.
The 1st step you'll be taking is to trace around your child's shirt to create a pattern. I recommend using your child's next size so you have a big of wiggle room if you make a mistake. Use a shirt with a neckhole that is already big enough to go over your child's head WITHOUT using any snaps or zippers.
Unfortunately I was working with an existing pattern tracing, so I don't have photos of this step. But it's literally just tracing, and because you are using a knit fabric, there is plenty of forgiving wiggle room.
I measured up from the hem as high as I wanted the dress skirt to be, then I cut it off.
My bodice pattern was too short, so I estimated some extra length in it. Line this up on the center fold of the t-shirt. You should be cutting through four layers of fabric.
Your front and back pieces will look a LITTLE different. The front neckline dips a little lower, and the front armholes cut in a bit further.
You should have some scrap pieces that look kind of like this. OR, if you are using a t-shirt, you can cut down the sleeves on that.
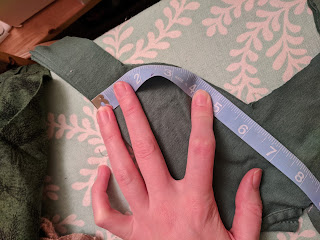
To figure out the size of your sleeve, measure the armhole on the bodice.
Then measure out this on the top of the sleeve. You can use your child's original shirt as a template here. This piece is cut on a fold. You will need two of them.
If you are using a t-shirt and cutting down those sleeves, make sure to cut it out so that the original sleeve hems remain the new sleeve hems and save you that step later on.
Here is one sleeve, still folded in half. Length is totally up to you. I only had enough fabric to make elbow-length sleeves.
You should have a leftover pair of scraps that are long and strippy.
Measure the bodice neck...
Then cut two rectangles that are slightly shorter than the neck circumference...
...and about an inch wide.
You should now have 7 pieces that look like the above, including any lace you saved from the camisole neckline.
If you used a camisole, save those straps!
Take off the findings if applicable and set aside.
Now you are going to sew the shoulder seams.
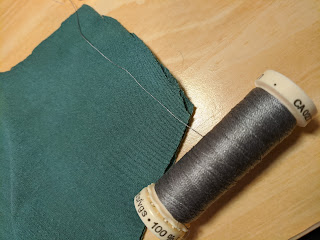
Match the thread as best you can. I didn't have any teal thread of this subtle hue, so I went with gray. Gray thread is a seamstress's secret weapon for these occasions!
Set your machine to a small zigzag stitch. I set my width and length both just under 2.
Sew across the shoulder seams, right sides together.
You must use a zigzag stitch because the zigzag has enough give in it that the knit fabric can stretch without breaking the stitches.
Now take the two long rectangle pieces. Sew the short ends together, right sides together.
Double the sides over and iron.
Pin this circle into the neckline, matching raw edges, lining up the side seams, and spacing the material evenly. The collar circle will be slightly smaller than the bodice neckline and you will need to stretch it slightly as you sew. If you've never sewn with knits before, have patience and be aware that you may end up doing this step twice.
Stitch slowly and carefully!
Take it off the machine and iron it down.
As you iron the neckline down, it should suddenly look quite...professional! You might have a giddy moment of "oh my, did I just make that???"
Next we will be finishing the sleeves! I used the straps from the camisole and will show you my method below. However, if you have enough fabric left over, you can also finish the sleeve hems the way you did the neckline hem. Or, of course, if you know how to use a twin needle, you can just do a hem that way.
And if you cut them down from t-shirt sleeves, then this step is already complete.
Cut two camisole strap stripes just a bit shorter than the sleeve edges.
Lay the camisole straps along the right side of the fabric, then secure in back with whip stitches. You can use large whip stitches, or tiny ones. Up to you!
Flip it over and you've got a pretty spiffy edge.
Now, right sides together, line up the bodice and sleeve armholes, matching centers and edges. You may need to stretch slightly as you sew.
Pin in place. Always pin before sewing! I am super experienced so I don't always pin, but I highly recommend doing so as it saves much frustration.
Sew carefully. Because you are sewing two curves together, the fabric will want to pucker. Pause often to smooth out the puckers. Pull ever so slightly on the fabric as you sew.
Once done, you can open up the bodice and press the sleeves. Here you can see one sleeve pressed and one still lumpy. What a difference it makes!
It is now time to sew the edges of the sleeve and bodice.
On baby clothes, you can do this in one long seam. (On adult clothes, these seams are usually completely prior to hemming and attaching sleeve and bodice, but the circles are too small to achieve this on baby clothes.)
Start at the sleeve hem, matching the edges up VERY carefully. Sew down to the bottom of the bodice, matching the armhole join on both sides.
Once sewn, clip the corners at the sleeve hem so that they don't poke out.
Your bodice side should now look like this.
Turn it right side out and admire your work! The hardest parts are done!
Now you are going to fold both your bodice and your skirt piece into 8ths.
Taper the skirt, leaving just a little more fabric in the skirt than in the bodice to allow for seam allowances. Cut ONLY until the edge of the lace, tapering out as you go.
Your skirt should now be a weird looking piece with four offshoots like this.
But now you are going to sew up those sides again!
Match up the top hems and sew down to the lace, tapering off into a nice dart at the end.
Teeny tiny dart at the end!
Turn it right side out and iron and it looks like a proper skirt.
Use pins or a fabric pencil to mark the exact center of each skirt panel and the center of the bodice hem front and back. Line up the center of your skirt panels with the markings on the bodice, and the side seams. This will result in a panel perfectly centered in the front and back of your dress.
Sew the waist seams together, stretching ever so slightly if necessary, right sides together.
Turn right side out and iron. If you have no additional lace, this is it! Your dress is done!
If you have any lace, line it up across the bodice, just covering the waist seam.
Pin in place carefully.
Here you will need to increase your zigzag slightly, to about 2.5 in both length and height.
You will zigzag down right on the top of the lace. Go slowly and do not let the fabric bunch or distort. sew slightly in from the lace edge (not right on the edge. This will mask your stitches better).
IF you have raw lace edges at the side seams, stitch those down too.
And voila! The dress is done! Now pull it on your wiggling toddler and try to get a few pictures of your masterpiece. If you share on instagram, please tag me so I can see your results! @seamstressconfessions


