Pages

Tuesday, July 31, 2012

Regina's Riding Coat - Part 3

Having got the base of the costume finished, we now apply details!


First off, buttonholes. Always a bit scary, but if you have a buttonhole feature on your sewing machine and mark them out carefully, they're nothing to be afraid off. I actually didn't make them quite close enough to the edge and so had to go back and fix that with handsewing, as you'll see later.


Then covered buttons! I found it easiest to sew the buttons on first, and then cover them.


Circle of velvet, stitch around, draw it up like a drawstring bag and...


Beautiful covered button! Because velvet tends to shed, I tucked a bit of craft glue in to keep it from shedding.


Progress so far...


Adding the buttons to the sleeves.


Regina's coat has puffed sleeves, so I had to do a bit of research to figure out how to imitate the look. Turns out using shoulder pads on the armhole does the trick.


Here's that extra fixing by the buttonholes that I mentioned earlier.


Like the back waist seam, I first attach all the layers of the sleeve to the corduroy armhole seam...


...and then tack down the lining.


I had a model who was just about the same size as my customer, so I was able to get some lovely pictures of the completed coat!


All it in all it was a very challenging but extremely rewarding project. I'd do it again... but would have to raise my fee significantly!

Speaking of which, are you looking for someone to make a costume for you? Check out my commissions page to learn how you can hire me to create the ensemble of your dreams!

Tuesday, July 24, 2012

Regina Riding Coat - Part 2

Now that the coat is cut out (see Part I), it's time to begin sewing! 


I do the collar and cuffs first. Velvet sheds like crazy, so I made sure to zigzag the raw edges (I didn't have my serger at this point).


As with any garment involving buttons, reinforcement is necessary. Here I use fusible interfacing. Fusible requires the use of an iron cloth (I just used a bit of linen I had laying around). I also used the iron cloth for ironing all of the velvet and corduroy exterior seams, to avoid leaving iron marks.


Another look at the garment, now that the main seams are all sewn.


Here and in the picture below you can see that I left the back waist seam open, to allow the pleating to be added later, once it is joined to the lining. (Otherwise the lining and the corduroy would have different pleats and it would add extra bulk that would mess up the shape of the garment.)


Hanging the corduroy on the dress form. Here is when I realized that my seam allowances were too small and had to go over all the seams again. Thankfully I caught it before I did the lining! (This is why you should always always always try a garment on constantly to make sure it fits right!)


Lining is sewn. I turn everything inside out and pin the lining to the corduroy on the dress form, so that it all follows the same gravity pull.


Pleating time! I basted the bottom waist seam corduroy and lining together, then folded in the pleats and sewed them to the top waist seam corduroy.


I then slipped the top waist seam lining over the exposed seam and stitched it down by hand.


This is a really good example of the difference between a "costume" quality and "tailor" quality garment as I define it. This is tailor quality - a costume quality rendition would either not involve lining, or would have exposed machine stitching on this seam. not a problem at all with a costume, but if you want a coat that looks as finished on the inside as it does on the outside, you'll want to pay the extra $$$ for tailor quality.


It's coming together...


Next: Sleeves, covered buttons, and nitpicky finishing touches!

Saturday, July 21, 2012

Regina Riding Coat - Part 1

Remember the secret project I was dying fabric for? Well this is it! A commission to replicate the seafoam riding coat worn by Regina (the Evil Queen) in "Once Upon a Time."


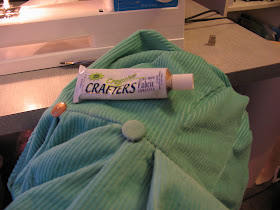
My customer and I worked together carefully to choose the most accurate fabric for the costume. Although I believe it is a woven stripe, my customer preferred a corduroy and tracked down the beautiful piece you see in the photo above.


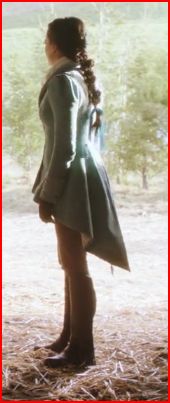
I then went into the episode itself and took several screencaptures to get as many angles and details as possible.


In the photo above you can see the contrast between the velvet collar and the main broadcloth.


Above is a look at the match between the corduroy and the velvet that I dyed. The fabrics are actually even closer then they appear in this picture, as you'll see as the project progresses.


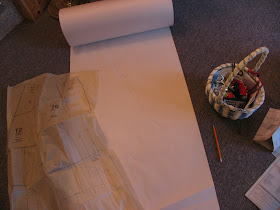
All set up to modify an existing coat pattern to work with this!


A look into my workbook, with the measurement grid and fabric samples. I keep pages like this for all my clients.

The pattern required some modifications, but not anything I couldn't handle. I used the collar pattern from another coat pattern to modify this one properly. The sleeve needed to be cut for the cuff and the lower piece extended to allow for overlap. The back of the coat needed to be split to properly replicate the back slope and pleats.


A closer look at the collar modification.


One thing I like to do once I get all the pieces of a project cut out/partially sewn, is assemble them in as near as possible mock-up of their final positions. Here you can see a rough idea of what the coat will look like...

Check out Part 2!

Wednesday, July 18, 2012

A Stitch in Time


This past week I was in Illinois for the 5th Annual ReginaCon (AKA The Fairy Tale Novels Fan Festival). It was a nice combination of planned events and social time. One of my favorite parts was the opportunity to do some hand quilting. Regina had been given an applique quilt by a friend to practice her quilting on and when I saw it I immediately asked if I could help. So we got a bit of an old-fashioned sewing circle going.

It was really relaxing work, and I really enjoyed having something to do with my hands while chatting. Now I really need to see if any of my friends back home are up for hand quilting, because I need to do this regularly...

Tuesday, July 17, 2012

Sorry for the disappearance, folks!


My e-mail address had some issues and because I was at ReginaCon I was away from the internet for 7 days and didn't even know there was a problem until today. Yikes! Anyhow, everything is back and working now. Thanks for your patience! 

Monday, July 9, 2012

Attention folks!

Hey fellow sewing fans!

So I'm off to have a grand adventure out east and will be staying in several different places doing tons of stuff with lots of people for the next four weeks.

However I've been storing up some costume projects to blog about, so you'll still get your regular dose of Seamstress Confessions, however the timing/spacing might be a little weird at some times. Thanks for your patience!

(Meanwhile, go out and get a copy of Trisha Biggers 'Dressing a Galaxy: The Costumes of Star Wars'. I just read it and it is fantastic, even if you're not a SW fan you will be drooling over it!)

Saturday, July 7, 2012

The Costumes of Star Wars - Padme Amidala

Let's be honest. Every costumer geek worth their salt knows something about the costumes of Star Wars. They're iconic. And there are tons of websites devoted to (or devoting sections to) the making of and how to reproduce these costumes.

So what am I doing here? This post is purely a love letter to the costumes of Padme Amidala. It was her beautiful dresses that sparked much of my interest in costume design (other than the Tudor England variety) and to this day I remain in awe of the artistry that went into designing her wardrobe. 

If you want to know more about how the costumes were made, or the other awesome pieces designed for the Star Wars universe, check out the links below. Otherwise, keep scrolling for my thoughts on my favorite Padme costumes!


First up we have Padme's gorgeous meadow dress, from Attack of the Clones. It's a beautiful gown with elaborate embroidery and embellishment, and was so fragile that Natalie Portman had to be carried up the meadow so it wouldn't be harmed!


I am utterly in love with the layering of this dress and the details.


Just look at the sleeves and that bodice... it's like a piece right out of a Pre-Raphaelite painting!


It is harder to find a picture of Padme's funeral gown, as it is only glimpsed in a very short scene during which she is in her coffin. However it's a gorgeous dress, and the ripples of the water effect are hauntingly beautiful.


Padme's throne room dress is the first gown we see her in, and it serves it's purpose in making her look far older than her fourteen years. Drawing on influences from the Orient and Russia, it is deceptively simple at first glance, revealing layers of detail as you look at a high rez photo. 


Padme's wedding dress is gorgeous and has an almost 1920's look in it's beading and cut. Her veil is gorgeous and yet unique, making it memorable but in an enchanting way.


I love how the embellishment on the sleeve is set against a chiffon so sheer that it is nearly invisible. Padme is all delicate innocent, contrasted with the heavy, brooding blacks of Anakin's Jedi robes.

Check out my replica of Padme's Wedding Ensemble starting here!


Padme's battle uniform is a well-thought out piece of work. It is pretty practical (except for being made of velvet which is a nightmare to wash) and is cut on uniform lines without becoming unregal or unfeminine.


When Padme became pregnant in The Revenge of the Sith, she was clothed in heavy draping garments to disguise her condition, and the camera usually lingered around her face. So we see less detail in the bodices and waists of her clothing, but some very lovely touches around her neck. Take for example this high, severve collar, softened by the gathered velvet and embroidered cloak.


Believe it or not, I like this costume.. It's long, and flowing, and quite simple but with nice details in the belt and sleeve embroidery. It also displays her stomach very well - and if you're going do display your stomach, might I recommend this costume instead of Leia's slave girl get-up? It'd be much more unique!


In Attack of the Clones Padme goes incognito, leaving behind the heavy velvet uniform of the first film for a lighter ensemble allowing freer movement. It's a bit too skintight for my liking, but at least she's covered up. Oh wait...

But putting modesty issues aside, this is really a pretty practical uniform, and space-agey with it's incorporated wire bust support (no need for a bra, you can just throw this on!).


I'm always torn about this dress. On the one hand, I like the idea behind it and the graduated coloring. On the other hand, I feel that it and the hairstyle (see actual hairstyle here, above is photoshopped) make Natalie Portman look really different than normal, and that always pulls me out of the movie.


May I introduce you to another one of my favorite costumes? Padme wears this in her second appearance in Attack of the Clones, when she meets Anakin and Obi-Wan for the first time in ten years. It is regal, but alluring, with simple lines and intensely detailed fabric. It draws on Elizabethan styles, but incorporates a African styles with the reed choker and headpiece.


Here we have another of the pregnancy gowns. Like the others, it is very subdued and draping, with a nice touch in the delicate lace shawl and exquisite beaded waist. These details make an otherwise dowdy dress really quite beautiful and elegant.


When I first got into costume design, I loved drawing pictures of dresses with gradiated colors. Looking back at the timing of those drawings with the release of The Phantom Menace, I think I can safely say my obsession started here. The handmaid dress is a simple mix of medieval and middle eastern styles, with deceptively plain cut and draping made rich and deep by the warm color variations. Someday I would very much like to honor my early love of this style by dying my own pieces to recreate this dress or something similar.


I've always had a strong affection for the refugee dress from Attack of the Clones, although I like it better with the cape. I'm not sure if it's the strong Spanish/Moorish influence, the delicate lace veil, or the deep vivid  colors and prints of Mediterranean culture that we rarely see on Padme.


here we see Padme's first nightgown, which is a sort of Greecean draped garment in blue satin. I've always liked the design, although the pearls on the arms would be a nightmare for any kind of mobility.


I like this nightgown a bit better, as it looks more comfortable, although the gloves strike me as a bit odd. Still, I at least can't refrain from drooling over the intricate embroidery on the cuffs and collar.


This dress is one of my top five favorite Padme dresses, and I am forever in love with it. The soft gray sleeves, caught up in delicate silver bands, the structured bodice of deep blue velvet fastened with an elaborate brocade panel, shimmery rough blue silk of the deeply gathered skirt... I could gush on for quite awhile about this one!


For some reason this dress makes me think 'peacock' although it really has more of a death bird look, with the distressed lace and dark black ridges.


I was unable to find a better picture of Padme's decoy costume, but I did want to give it a nod. At least in this picture you can see her awesome hairdo.


Ah yes, the proof that George Lucas should never be a costume designer. Let's be honest, it's a beautiful piece on it's own, but it doesn't suit Padme, it makes her look like a fetish piece.


Here we have a fascinating look into some of the concept art for Padme's wardrobe. Some of the pieces are pretty close to the final results, others went through some serious revisions!


Lastly we have Padme's Naboo nightgown, which is a beautiful simple white, covered with a gorgeous thick blue robe. I'd just love to snuggle up in that, wouldn't you?


I love Padme's costumes so much, that when I joined a Star Wars RPG group, of course I had to do some of my own designs in the Star Wars universe! You can view them here.