Friday, July 17, 2015

Walter Worker Dress (SPG) Part 3

This post is part of a series. Read Part 2 here.


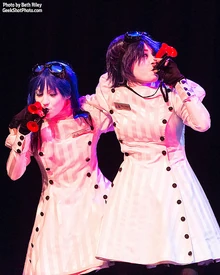
Here it is, folks! The finished dress!


My hands were hurting so much from fibro join pain that I could only sew on about six buttons at a time.


Credits for the following photos: Cosplayer - Meg Graham, Photographer - Mary Rose Graham.
A finished costume on it's own is impressive, but what really makes it something special is when the cosplayer pulls together the whole ensemble. Meg did a great job here with all of the little details to complete her Walter Worker!


Wednesday, July 15, 2015

Whimsical Kitchen Dish Towels are here!


I have a new Etsy shop!

Whimsical Kitchen is your one-stop home for unique dish towels that express YOU!


I've got 10 fun designs currently listed, available in both saver and premium thread counts, and will do custom color orders as requested!


I want my store to be as good as possible, so please let me know if you run into any issues while ordering!


I have plenty more designs I want to add soon - let me know if there is a certain theme you'd like to see!
Monday, July 13, 2015

Walter Worker SPG Dress Part 2


This is where we left the dress at before.


The sleeves needed some further detail - mainly cuffs...


...and buttons! I got these buttons from Bennos Buttons, which is great for getting buttons in bulk.


Coming together!


Time to cut out the apron. I took the front panel pattern piece and made a few slight alterations, then used it to cut out the apron pieces.


The apron needed to hold its shape, so I decided to line it (unlike the rest of the dress, which I wanted to keep simple and cool) and also interface it with a featherweight interfacing.


But before attaching the apron, I needed to finish the other dress details, like sewing on sleeves and adding pockets. The original costume does not have pockets, but such things are in vogue with young ladies these days, and my client wanted them added. So I picked apart the side seams where I wanted the pocket openings to go.


I then cut and stitched simple pockets with a downwards slant and slipped them in.


I had to fiddle a little bit to figure out which right/wrong sides to match up in order to ensure that the seams would all be inside and the finished edges on the outside. Then I pinned and stitched each edge of each pocket down.


Inside out...


...right side in!


Even with ironing, the pocket still wanted to be pretty billowy. So I topstitched the upper edge of the pocket. It helped a LOT.


I then stitched the sides and upper edges of the apron, turned it right side out and pinned it onto the dress form to straighten the hem. Once cut, I pinned the hem edges up inside to conceal them.


I then topstitched all four edges of the apron, with the topstitching securing the hem in place.


Looking snazzy!

All I had to do was pin the apron in place...


...and use the buttons to hold it on! (There are no buttonholes, the buttons are decorative only, although their threads do hold the apron on).

Ready to see how my client turned it all into a full cosplay with AMAZING make-up? Check back in a few days for Part 3!


Saturday, July 11, 2015

Dark Swan Photo!

Entertainment Weekly has the scoop on "Once Upon a Time" headed with a high rez photo of the new Dark One.


Now THAT is a look we've never seen on Emma before! Read the whole article here. 

Monday, July 6, 2015

Walter Worker (SPG) Part 1

My latest commission involved replicating one of the Walter Worker dresses (Steam Powered Giraffe) for a fan.
From http://steampoweredgiraffe.wikia.com/
I don't listen to the band myself, but I've got a couple friends who are into it and the premise is interesting. You can read more about the band and the Walter Workers in particular here.


I started off by making a muslin base to fit on my client. Since she is local, I was able to do a bit more nitpicky fitting than I normally am able to.


I draped the bodice and mathematically drafted the sleeves.


My client needed a few tweaks, as there'd been a change in size since we originally measured her and when I was able to actually start sewing. (This is why I always try to get my clients to give me their measurements as close to start time as possible.)

I also switched from side darts to full princess seams.


I then took the muslin apart and transfered the measurements to paper patterns.


Stitching it all up!


 We worked it out so that I saw this client two days in a row, and could test the body of the dress right away and make a few further adjustments.


BTW, the fabric is five yards of a bridal satin I found on eBay.


Very simple collar.


I then put the zipper in to make it easy to put the dress on and off the dress form, as opposed to having to pin up the back each time.


I was quite generous in the hem allowance, to say the least!


The fabric was a bit fussy to work with, and I went with my blind hem foot to eliminate as much puckering from the hem seam as possible.


Sleeve time! The first time I cut out the sleeve puff, it was too small. :(


So I cut it again and added some tulle to the inside to help accentuate the puff shape.


Much better!

Sleeves, buttons and an apron in Part 2!

Wednesday, July 1, 2015

I am Writing a Sewing Book


Those of you who hurried up and followed my new instagram sewing account got first look at this announcement on Monday.

I'll be honest, these plans are still in the very early stages. So why announce now? Well, two reasons.

#1. This is a book for YOU. That means that I want to get feedback from my readers from the get go, so I needed to let you into the 'secret' right away!

#2. It's going to affect my future sewing queue (but this is not a bad thing). I have four garments left to finish, and then the 2015 queue will be complete. After this, I am hoping to focus solely on creating and testing projects for the book until early 2016.

I'm actually really excited about this. My health, particularly with the new addition of fibromyalgia joint pain, has made it increasingly difficult for me to meet client deadlines. I will be on track, ahead of schedule, and then sickness will knock me out for a week and suddenly I'm not just behind on work, I'm behind on cooking and laundry and cleaning and spending time with my family. It's become very stressful. So hopefully working on the book will release some of that deadline pressure, and also create a continual revenue source for future sick times.

As I said on instagram, my goal is to create a resource for beginning sewers to construct costumes on a budget. This isn't a "teach you how to sew" book, it is a "you can sew a straight line, now here's how to create your cosplay and not break the bank with it" book. (but don't worry, in chapter one I'll tell you where to go if you want to learn some basic machine+stitching stuff first!)

What I am hoping to teach you is how to get the best bang for your buck with materials, make deft (but easy!) alterations to thrift store finds to turn them into awesome costumes, and use your own measurements to make simple patterns for easy but stunning core pieces for various historical and fantasy/scifi scenarios. We'll also talk about props, and techniques for working with fussy materials like pleather, foam armor and knits.

This is how I learned to sew. I didn't use a commercial pattern until I was almost 13, and to this day I make my own patterns as much as I alter commercial ones. It isn't nearly as hard as it sounds, and I'm going to teach you how!

I'll also include tons of resources, which will all be hyperlinked in the ebook. (Yes, I'm planning to release it in as many digital reader formats as possible, and I'm planning right now to keep them under $5 each. Budget conscious is the byword of this project, after all!).

If you are going to prefer a paperback hard copy, do speak up! I'm doing research into how to do it economically - I don't want to charge more than $16 if possible. However doing that layout is significantly more work than just the ebook, so I would need to know if there was enough interest for it. I'll be running polls for that later on in the process, but appreciate feedback whenever.

This volume will be specifically created for beginning sewers. If it works well, I might do a second volume for intermediate seamstresses, but that's a LONG way off with a lot of 'ifs'.

Let me know if this is a project you are excited about, and what you hope I might include! You can leave a comment below, on my facebook page, my instagram, or send me an e-mail!

I'm SO excited and can't wait to get going!