I am just so beyond excited to be starting my own business. I've done some work on different ideas over the years, but the timing has never been right. Now however I've got the time, the need, a good product, and a fantastic business partner. Plus I'm just thrilled about the name: Your Little Princess Costume Design.
It's a lot of work to start up a business, but it's really exciting to see everything start to come together. Amanda e-mails me updates on the website every week or so and it just looks so professional and cool.
Meanwhile I'm busy working on patterns, designs, ordering systems, dress descriptions, and writing up sizing explanations. We've come a long way! Just today we confirmed our fourth model, so very soon I'll be sewing up the first dresses and we'll be scheduling photoshoots shortly. As soon as we have the photos we'll get them up on the website and I'll do the final pricing evaluation and then we'll be open for business!
As someone who loved playing dress-up as a child, it brings me such joy to create a costume that will be loved and treasured by a little one. They're not just pieces of clothes, they're keys to the world of imagination and keepsakes that will be saved and treasured. How blessed I am to be entering into a business that will bring many smiles and imagination to life!
Want to see the designs we've developed so far and track the latest news? Check out and follow our Facebook page!
Monday, April 16, 2012
Friday, April 13, 2012
Turning a T-Shirt into a Kindle Cover
Back in February I received a Kindle as a birthday present from my grandparents. However I did not want to shell out over $20 for a decent case. So I decided to experiment and make my own.
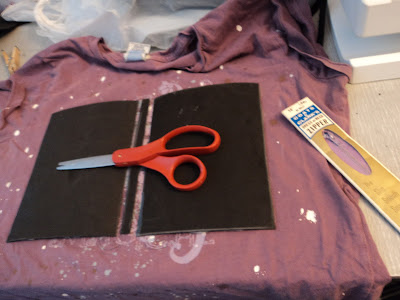
First off I cut out craft foam to protect the front, back, and non-zippered side.
I then attempted to make the case water-resistant by gluing plastic to the foam. However after two days I realized that it wasn't going to dry, as the edges had sealed off, making it impossible for the excess glue inside to dry properly. Scratch that!
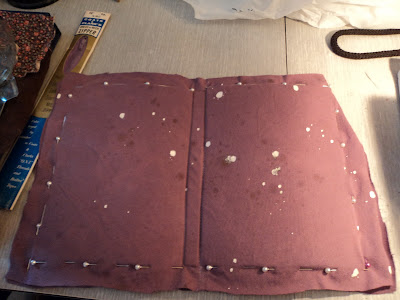
I sandwiched the foam between the two layers of fabric and stitched everything in place with a zipper foot.
I choose to stitch the foam in place before securing the edges. This meant there was a lot of visible stitching in the end product. I don't really mind here, but if I were going to sell them, I would experiment a bit more to get a more professional looking product.
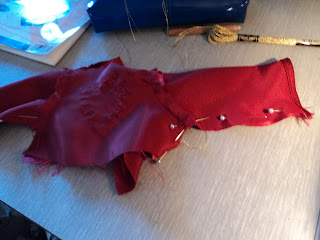
Next I sewed in the zipper, then attached the two loose ends. And tada! A really inexpensive Kindle case that sports the graphic from a much loved but no longer fitting t-shirt.
If you've never worked with knits before, you may find it easier to just use a woven fabric. Also, you can add further support to the case by inserting thin cardboard over the foam. Stiff sheet plastic (think milk jug grade) might also be useful here.
Total cost of this project? Depending on how much you pay for the foam, zipper and fabric, not more than $5.00. Because I bought the foam in bulk, the zipper was from a garage sale bargain, and the t-shirt was going to get tossed anyhow, my total expenses were probably less than $.50.
How much time? Minus the plastic and glue fiasco, it took me less than an hour.
I'm hoping to apply this design to other cases (camera, laptop, etc) and work out some of the kinks. I'll keep you posted!
Tuesday, April 10, 2012
Introducing "Your Little Princess Costume Design"
Remember this logo? Well I am very excited to reveal that my friend Amanda Dominick and I are officially launching a business making high quality costumes for little girls. From the fantastical to the historical, our costumes are completely customizable to become a unique treasure for the little princess in your life!
For more information and updates, please check out our facebook page here: https://www.facebook.com/YLPCostumeDesign
For more information and updates, please check out our facebook page here: https://www.facebook.com/YLPCostumeDesign
Monday, April 9, 2012
Still around!
Thanks for your patience! I was in the ER this week with a migraine from hell and the recovery period has been cruddy. Pictures and therefore fashion aren't something my eyes want to dwell on much. I should be back shortly, however!
Thursday, April 5, 2012
What are you wearing for Easter?
Dressing up for Easter is a time honored tradition among Christians, becoming such a staple of our culture that it scored a Fred Astaire/Judy Garland film titled "The Easter Parade." While the focus of the holiday is the spiritual center of the Christian religion, it also is one of those rare occasions (in addition to weddings and Christmas) that nearly always merits a special - and often new - outfit for women.
Easter often takes me by surprise, but one year I did go all out for it, designing and sewing (with some assistance) coordinating dresses for myself and the four girls I nannied for at the time.
This year it's not certain that my health will allow me to make it to Easter services, but I hope to wear the Shabby Apple Biacami dress that I won in this giveaway.
What do you plan to wear?
Monday, March 26, 2012
Miniature Jean Grey - Part Two
The adventures of American Girl Doll to Superhero continue! (Read Part One here)
Next I draped fabric around the foot and pinned it in place to get the sides.
Then I cut the pieces out of the gold fabric. To keep it from unraveling while I worked with it, I finished the edges with a zig-zag stitch. (Yes, I know, I desperately need a serger)
Attached the boots in front...
Hemmed the edges and stitched tops to bottoms. The boots fasten in the back. My pattern needed a little tweaking - as you can see the boots are not perfect and I plan to fix the problems in my next attempt with doll #2.
I created the sleeve patterns much as I did the boots. The notch indicates where the stitching ends. From the notch to the hem the gloves are fastened with snaps.
Look! Gloves on an American Girl Doll! Who knew it was possible?
Yes, they still look kind of like mittens. So I use my gold embroidery thread to stitch down the gaps between the fingers.
The two middle fingers are stuck together on the doll, so this stitching is merely decorative.
Last piece is hemming up the sash and... voila! A miniature Jean Grey of the X-Men!
Is there a costume you'd like made for YOUR doll? I'm open for doing commissions for just about any kind of costume, estimated cost $35 or so. Send me a line at elenatintil [at] gmail [dot] com if you're interested!
Saturday, March 24, 2012
A Miniature Jean Grey
I, like many other young women, have fond childhood memories of playing with my American Girl Dolls. Also, like many other young women, I have the trouble of figuring out what to do with them once my playing days are over. I refuse to put them into storage, so that leaves me with figuring out how to display them...
The top of my bookshelf is perfect. However the dresses were all made nearly ten years ago and I'd like to update them a bit. Also make the display a bit more tied into my current interests. So I hit on the idea of giving them X-Men costumes - but adapting the costumes just as I would for a 10-year-old girl, since that is after all the body shape the dolls have.
For Felicity I picked Jean Grey's Dark Phoenix costumes because, while I'm not crazy on Jean, I adore that costume. Above is my initial sketch. Not too many changes, but I did decide to go with a skirt because that seemed more age appropriate/fun to me.
It's been awhile since I drafted a pattern for American Girl dolls. For the most part this one turned out all right, and only careful inspection would show any problems. I did, however, note some issues that I'll need to correct for future projects.
The next issue was the Phoenix emblem. I had some nice gold material in my large fabric stash, but it is the easily fraying kind which meant that making something that small yet detailed was going to be a pain. I solved this issue by using a diluted craft glue to apply the gold to a spare scrap of red. This protects the gold from fraying, and adds stability for cutting out and sewing the tiny details.
I cut the circle in the proportional size before checking my reference photo. If I were doing it again I'd cut it in a triangle instead.
Here you can see a bit of Jean's original costume, alongside my applique. Here I'm just beginning the process of binding the edges.
Tacking down the Phoenix. To a viewer, it looks as though the phoenix was stitched onto the red fabric with the gold thread. ;)
A trick for doing doll sleeves is to set in the sleeve before sewing the sides of the sleeves and bodice. You can do those seam in one swoop, as demonstrated below.
Bodice is coming together! I went back and forth on the collar and finally decided to add one.
The collar is just a folded over rectangle, with one end stitched into a notch for overlap.
A quick peek at the bodice!
The skirt was a simple half circle that I hemmed and attached at the waist. Looking pretty sweet?
Stay tuned for a bunch of gold as I take you through the craziness of crafting doll-sized boots, glove, and sash!
Subscribe to:
Posts (Atom)


